A while back, I came across a thread on the EnCase EnScript forum asking for assistance in getting EnScript to recognize the interfaces for a DLL created in C#.Net through COM. I created a self-contained C# demo project to help out. The original code can be browsed on github for branch “v0.1”. This post is an update to the information in that thread with extra references and an update on 64-bit OS usage. I recently updated the code which, as of this posting, can be found on github for branch “v0.2” or on the EnScripts page of the website. If you’re still interested, please download the code and follow along. If you’re a glutton for punishment, feel free to read all the links in their full MSDN glory.
In the scenario, the same DLL would work just fine when accessing its methods and properties through VBScript, but EnScript wouldn’t “see” any of them. This wasn’t so much an EnScript or, necessarily, a .NET problem. It’s actually an issue with the early binding that EnCase requires in combination with the lack of registration on the part of .NET.
Making the Code Work:
There are, however, a few things to take care of in the code before worrying about registration. Your interface should be set to InterfaceIsDual, your class interface type can be set to None, and you should set ComVisible to true on both of them. In the code below, you would replace InterfaceGUID and ClassGUID with your own previously generated GUID values. If you’ve worked with Visual Studio for any length of time, you’ll soon discover that you should generate your own GUIDs ahead of time using guidgen.exe and manually assign them, otherwise Visual Studio will create new GUIDs every time you run Regasm.exe (which is annoying). The below code can be found in the demo in CDemo.cs.
[Guid("InterfaceGUID"), InterfaceType(ComInterfaceType.InterfaceIsDual)]

[ComVisible(true)]

public interface _COMDemo

{

...

}

[Guid("ClassGUID"), ClassInterface(ClassInterfaceType.None)]

[ComVisible(true)]

public class COMDemo : _COMDemo

{

...
Before we get any further, I should also mention in passing that it’s always best to use Strong-Named Assemblies.
After your code is all set, we need to deal with the registration issues. The first thing we need to do is register our DLL in the Global Assembly Cache using Gacutil.exe or a capable installer:
gacutil.exe /i CDemoLib.dll /f
Next, we’ll register the assembly for COM access using Regasm.exe:
regasm.exe CDemoLib.dll /tlb:CDemoLib.tlb
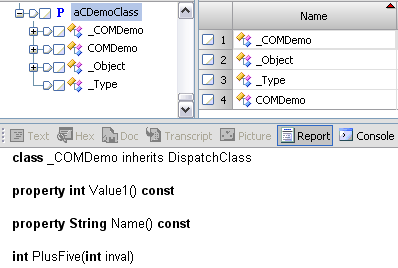
Creating the TypeLib using Regasm.exe generates a default interface with no methods. VBScript makes only late-bound calls into the assembly; it doesn’t use the TypeLib so it doesn’t care that the default interface is empty. Here’s what that gets us:
Regasm.exe also fails to add all of the keys in the registry that are required for early-binders and these can be hard to track down. Take a look at the keys that are missing below.
Windows Registry Editor Version 5.00

[HKEY_CLASSES_ROOT\CLSID\{ClassGUID}\Control]

[HKEY_CLASSES_ROOT\CLSID\{ClassGUID}\MiscStatus]

@="131457"

[HKEY_CLASSES_ROOT\CLSID\{ClassGUID}\Typelib]

@="{TypelibGUID}"

[HKEY_CLASSES_ROOT\CLSID\{ClassGUID}\Version]

@="1.0"
HKEY_CLASSES_ROOT is an alias for HKEY_LOCAL_MACHINE\SOFTWARE\Classes. These keys are essential for the methods and properties to be COM accessible to early-binders. The Control key identifies our object as an ActiveX control. The MiscStatus key takes its values from the OLEMISC enumeration. The Typelib key points to the GUID of the Typelib, which is the GuidAttribute of the assembly (found in AssemblyInfo.cs). And Version is pretty straightforward. This article mostly applies, despite its age. After adding our custom entries:
After you’ve thrown in all the extras, you should be ready to go with EnScript! Fire up EnCase and take a look at the sample EnScript that’s included with the code. The first thing you’ll notice at the top is the typelib instruction.
typelib aCDemoClass "CDemoLib.COMDemo"
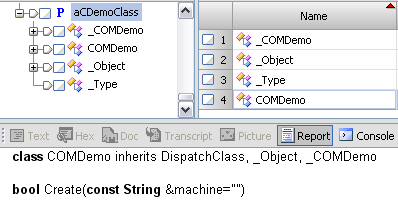
This tells EnCase to retrieve the CLSID for the assembly from HKEY_CLASSES_ROOT\CDemoLib.COMDemo\CLSID, then locate the CLSID at HKEY_CLASSES_ROOT\CLSID\{ClassGUID} and import the TypeLib specified. If we got everything right, you should see this in the EnScript Types tab of EnCase:
Magic!
You can see the properties and methods are showing up just fine. Next we’re going to declare our variable using the newly imported class and call Create() to instantiate the object.
aCDemoClass::COMDemo acd;

...

acd.Create();
That’s it! You can see from the demo code that we can set and retrieve the values of our properties:
Console.WriteLine("Value1: " + acd.Value1());

...

acd.SetValue1(1000);

...

Console.WriteLine("Value1: " + acd.Value1());
Output:
“Value1: 0”
“Value1: 1000“
And we can also utilize the methods from our DLL:
Console.WriteLine("acd.PlusFive(7): " + acd.PlusFive(7));
Output: “acd.PlusFive(7): 12“
64-bit
Recently an acquaintance was having issues with getting the project to work in a 64-bit OS, so I updated the example registration files for version 0.2. The only real difference is that you run the 64-bit version of Regasm.exe from the Framework64 directory. This inserts the necessary info for use with the 64-bit version of EnCase. The same registry keys we inserted above still apply because Windows aliases the proper section of the registry for 64-bit usage. The latest version of the code updates the project to Visual Studio 2010 and I’ve confirmed testing for .NET Framework versions 2 and 4 with the new project.
Got Errors?
If you forgot to perform any registration at all, you’ll probably see, “Expecting ‘field or method declaration’, Custom dotNet COM Object(13,13).”
![]()
Depending on the version of Regasm.exe used, if you don’t add the custom registry keys, when you run the script you might see a “Class not registered” error or something similar.
Anything I missed? Drop me a line in the comments.


